m (→Group info) |
Nanaki.bot (talk | contribs) m (Bot: Adding es:Temple of Atal'Hakkar, pl:Temple of Atal'Hakkar) |
||
| (41 intermediate revisions by 22 users not shown) | |||
| Line 1: | Line 1: | ||
| + | {{outdated|Needs more {{cata-inline}} Cataclysm update.}} |
||
{{infobox instance |
{{infobox instance |
||
|name=Temple of Atal'Hakkar |
|name=Temple of Atal'Hakkar |
||
|aka=Sunken Temple, Temple, ST |
|aka=Sunken Temple, Temple, ST |
||
| − | |ss=Atal'Hakkar |
+ | |ss=Temple of Atal'Hakkar loading screen.jpg |
|caption=Temple of Atal'Hakkar loading graphic |
|caption=Temple of Atal'Hakkar loading graphic |
||
|loc=[[Pool of Tears]], [[Swamp of Sorrows]] |
|loc=[[Pool of Tears]], [[Swamp of Sorrows]] |
||
| − | |race={{Green Dragonflight |
+ | |race={{Race|Green Dragonflight}}<br />{{Race|Jungle Troll}}<br />{{Race|Undead Troll}} |
| − | |boss=[[Avatar of Hakkar]] |
+ | |boss=[[Avatar of Hakkar]], [[Shade of Eranikus]] |
|type= |
|type= |
||
| − | |level= |
+ | |level=50-60 |
| + | |minlevel=45 |
||
|players=5 (10) |
|players=5 (10) |
||
|key= |
|key= |
||
|bosses={{Temple of Atal'Hakkar}} |
|bosses={{Temple of Atal'Hakkar}} |
||
}} |
}} |
||
| − | |||
'''Temple of Atal'Hakkar''' (also known as '''Sunken Temple''' and more rarely, '''Lost Temple''') is a shrine erected by the [[Atal'ai|Atal'ai trolls]], led by their master [[Jammal'an the Prophet]], to the nefarious Blood God — [[Hakkar the Soulflayer]]. Believing that this was the intended site for Hakkar's reentry into [[Azeroth (world)|Azeroth]], the great [[Dragon Aspect]], [[Ysera]], and her [[green dragonflight]] sunk the temple into the depths of the [[Swamp of Sorrows]]...but the dragons did not realize that it was the wrong location until it was too late. |
'''Temple of Atal'Hakkar''' (also known as '''Sunken Temple''' and more rarely, '''Lost Temple''') is a shrine erected by the [[Atal'ai|Atal'ai trolls]], led by their master [[Jammal'an the Prophet]], to the nefarious Blood God — [[Hakkar the Soulflayer]]. Believing that this was the intended site for Hakkar's reentry into [[Azeroth (world)|Azeroth]], the great [[Dragon Aspect]], [[Ysera]], and her [[green dragonflight]] sunk the temple into the depths of the [[Swamp of Sorrows]]...but the dragons did not realize that it was the wrong location until it was too late. |
||
Many of the bosses in the instance have some kind of prerequisite in order to encounter them. [[Atal'alarion]] will appear after activation of statues, [[Jammal'an the Prophet]] can only be reached by killing the 6 [[troll]] mini-bosses, [[Avatar of Hakkar]] must be summoned and the [[Shade of Eranikus]] will only be killable after the death of the Prophet. |
Many of the bosses in the instance have some kind of prerequisite in order to encounter them. [[Atal'alarion]] will appear after activation of statues, [[Jammal'an the Prophet]] can only be reached by killing the 6 [[troll]] mini-bosses, [[Avatar of Hakkar]] must be summoned and the [[Shade of Eranikus]] will only be killable after the death of the Prophet. |
||
| − | The Temple may be entered by |
+ | The Temple may be entered by level 45. The mob level range is 40-55, with the final boss being 55. |
== History == |
== History == |
||
| + | [[File:Sunken_Temple_-_Official_Site.jpg|thumb|On the official site]] |
||
{{wow-dungeons}} |
{{wow-dungeons}} |
||
:''Over a thousand years ago, the powerful [[Gurubashi Empire]] was torn apart by a massive civil war. An influential group of troll [[priest]]s, known as the Atal'ai, attempted to bring back an ancient blood god named Hakkar the Soulflayer. Though the priests were defeated and ultimately exiled, the great troll empire buckled in upon itself. The exiled priests fled far to the north, into the Swamp of Sorrows. There they erected a great temple to Hakkar - where they could prepare for his arrival into the physical world. The great dragon Aspect, Ysera, learned of the Atal'ai's plans and smashed the temple beneath the marshes. To this day, the temple's drowned ruins are guarded by the green dragons who prevent anyone from getting in or out. However, it is believed that some of the fanatical Atal'ai may have survived Ysera's wrath - and recommitted themselves to the dark service of Hakkar.'' |
:''Over a thousand years ago, the powerful [[Gurubashi Empire]] was torn apart by a massive civil war. An influential group of troll [[priest]]s, known as the Atal'ai, attempted to bring back an ancient blood god named Hakkar the Soulflayer. Though the priests were defeated and ultimately exiled, the great troll empire buckled in upon itself. The exiled priests fled far to the north, into the Swamp of Sorrows. There they erected a great temple to Hakkar - where they could prepare for his arrival into the physical world. The great dragon Aspect, Ysera, learned of the Atal'ai's plans and smashed the temple beneath the marshes. To this day, the temple's drowned ruins are guarded by the green dragons who prevent anyone from getting in or out. However, it is believed that some of the fanatical Atal'ai may have survived Ysera's wrath - and recommitted themselves to the dark service of Hakkar.'' |
||
| − | The name Atal’Hakkar can mean either "Devoted to Hakkar" or "In Honor of Hakkar" in [[Zandali]], the language of the trolls. |
+ | The name Atal’Hakkar can mean either "Devoted to Hakkar" or "In Honor of Hakkar" in [[Zandali]], the language of the trolls.<ref name="Dark%2520Factions%2520127">''[[Dark Factions]]'', pg. 127</ref> |
== Geography == |
== Geography == |
||
| + | {{Outdated-section|Subzones are probably wrong post-{{cata-inline}} Cataclysm.}} |
||
| − | <gallery> |
||
| + | <gallery captionalign="left"> |
||
| ⚫ | |||
| − | + | File:tempelofhakkar.jpg|Outside the Temple of Atal'Hakkar |
|
| + | File:670px-SunkenTempleWithCata.jpg|Instance entrance before and after Cataclysm |
||
| ⚫ | |||
| + | File:WorldMap-TempleOfAtalHakkar1.jpg|Post-Cataclysm map |
||
| ⚫ | |||
| + | File:SunkenTempleDetailedCompressed.jpg|A very detailed map of Temple of Atal'Hakkar before Cataclysm |
||
</gallery> |
</gallery> |
||
| Line 38: | Line 43: | ||
|} |
|} |
||
| − | == |
+ | == In Cataclysm == |
| + | {{cata-section}} |
||
| + | The Sunken Temple was raised to a level 50-60 dungeon in Cataclysm. |
||
| + | |||
| + | == Quest guide == |
||
| ⚫ | |||
{| class="darktable" |
{| class="darktable" |
||
|- |
|- |
||
| Line 194: | Line 204: | ||
== Walkthrough == |
== Walkthrough == |
||
| + | :''See pre-{{cata-inline}} Cataclysm walkthrough at [[/Old walkthrough|Old walkthrough]].'' |
||
| − | The temple is split up into two main sections, separated by staircases (or the deadly hole in the middle of the upper pit), the first is mandatory for completing the main run of the dungeon (where you defeat the [[Shade of Eranikus]]), whereas the second section is the basement - a completely optional section, however there are two enemies there that have good drops ([[Spawn of Hakkar]] and [[Atal'alarion]]). Each of these two main sections contains a few floors - the main section has a top floor, a middle section (balconies), and a bottom (the dragon pit area). The basement also has a top and a bottom. |
||
| + | {{Sectionstub/Generic}} |
||
| − | |||
| − | If you don't have a lot of time to spare, stick with the main section and focus on the related quests or loot you are looking for (for experience, just explore wherever). However, if you do have time to take on the basement, you'll want to go there first. |
||
| − | |||
| − | === Optional: The Basement === |
||
| − | From the start of the instance, head forward and to the left. Run down to the bottom of one of the stairwells (not the two spiral staircases available from the entrance of the instance). The hallway area you reach is a giant ring around the main floor of the basement; this hallway contains [[Murk Worm]]s (aggressive) and [[maggot]]s ({{reputation|neutral}}), however, the maggots will aggro if you get in a fight so if there are any you can pick off, it's better to be safe than sorry. Note that there is sometimes a rare spawn that patrols this hallway, [[Spawn of Hakkar]] (it looks like a [[wind serpent]]). |
||
| − | |||
| − | Inside the circular hallway there are tunnels that lead to balconies in the inner chamber. Each balcony contains a serpent statue - by activating the statues in a specific pattern (south, north, south west, south east, north west, north east) you will summon [[Atal'alarion]]. If you want to save time here, you'll have to try and minimize the number of groups you take on in the circular hallway (although the running distance to avoid mobs may be just as burdensome). |
||
| − | |||
| − | After summoning [[Atal'alarion]], jump down to the left of the balcony you are standing on and clear the mob and any patrols around you. Heal up, and hop down into the shallow water. Wait for Atal'alarion to move away from the Murk Worms and try to pull them without aggroing him - fighting them together can be painful. He hits hard, so try to stun or CC him and keep your tank over healed (if you have someone with additional healing abilities you may want to use them; potions are also recommended). |
||
| − | |||
| − | From the pit of water, head straight up the stairs, down the hall, and up the spiral staircase back to the entrance of the instance. |
||
| − | |||
| ⚫ | |||
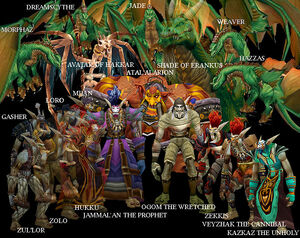
| − | This is the primary section of the temple, and the place where the boss for the achievement is located. There are many bosses you have to go through before you reach the final one ([[Zul'Lor]], [[Gasher]], [[Loro]], [[Zolo]], [[Mijan]], [[Hukku]], [[Zekkis]], [[Veyzhak the Cannibal]], [[Kazkaz the Unholy]], [[Jammal'an the Prophet]], and [[Ogom the Wretched]], [[Dreamscythe]] and [[Weaver]], [[Hazzas]] and [[Morphaz]], [[Shade of Eranikus]], and the optional [[Avatar of Hakkar]]), and trash mobs that vary in difficulty (some can CC you with sleep or fear, both magic debuffs that can be dispelled by priests, paladins, or Resto shamans). |
||
| − | |||
| − | From the entrance to the instance there are two passage ways (facing away from the portal, take either passage ahead of you), either one is fine as they both lead to the same place (just remember to go up the stairs first). Once up the stairs you can either go left or right, it doesn't matter, just stick to one direction. Along this circular hallway there will be several mobs, most commonly consisting of a large troll zombie (tank), a priest and/or bloodrinker (healer), and two imps (non-elites). Send an off-tank to attack the healer and the main tank to their tank (remember that you can probably CC one or more of the enemies in each group). At intervals you will see stone blocks with masks on them; these masks mean that if you go down it will lead you to a Protector (one of the six that protect the final bosses of the instance). Most of the protectors are very easy to kill, and will on occasion give some loot (BOP greens). When a mask leads you down stairs on the outside of the ring, clear the mobs at the landing, and then take the hallway on that floor (do not continue down the stairs). After defeating a protector in a location like that, head back up the way you came and continue around the circular hallway in the direct you previously were. Once you have cleared all six protectors, [[Jammal'an the Prophet]] will yell that the shield is broken. This begins the second part of the main instance. |
||
| − | |||
| − | Once you kill the final troll protector, '''jump''' off of the balcony as a group, preferably tank first. Be ready to fight a group of dragons immediately. Leaving ranged AOE and heals on top of the balcony while fighting is not a good idea, because if anyone pulls aggro, the mobs may rush off towards the stairs and pull additional enemies. Once down, you'll notice that in the center of the room there is a hole. This hole is directly above the shallow pool of water where [[Atal'alarion]] appears. '''Do not fall into the hole.''' You will end up taking a lot of time trying to get back up, but you will probably die (especially if you are not a Mage or Priest with the ability to float). If you ever want to go through the hole, make sure you have a party member cast [[Slow Fall]] or [[Levitate]] on you before you fall (note that you will probably float to one side of the ring, and potentially pull aggro from whatever mob is standing there). |
||
| − | |||
| − | Before seeking out [[Jammal'an the Prophet]], you should understand that if you do not kill every dragon welp and dragon kin in the instance (the guys on this floor), they will attack you during the fight with [[Shade of Eranikus]]. It is possible to kill the boss before they arrive to help, however your group will definitely be killed when they arrive. |
||
| − | |||
| − | ==== Jammal'an the Prophet ==== |
||
| − | From this point, there are three major and four minor bosses left to be killed. One of the three majors, [[Avatar of Hakkar]], is completely optional and requires a chain quest to be completed (starting with {{questlong|Neutral|44|Screecher Spirits}}). The boss order is pretty linear, with [[Avatar of Hakkar]] available to be defeated at any time. Linearly, first you should start with [[Jammal'an the Prophet]]. You can reach him by heading through the southeastern passage of the room (it curves northward into a room of pews). There are at least 7 groups of mobs in the area that you must eliminate. Each group primarily consists of a healer and two undead warriors (CC-able) that must be pulled back to the corner because they can fear you into other groups. This fear is a magic debuff and can be dispelled, and Undead can use [[Will of the Forsaken]] to get out of it quickly. Each of these mobs, when killed, will create an aggressive spirit that is immune to all damage and abilities; however each will die automatically after about 30 seconds. |
||
| − | |||
| − | After you have cleared the entire room of mobs, you can take on [[Jammal'an the Prophet]] (level 50) and [[Ogom the Wretched]] (level 49). Jammal'an is pretty simple to kill but will take a while. Melee DPS or an off-tank should pick of Ogom while the main tank keeps Jammal'an on them the entire time. Kill Jammal'an first, as he has the ability to turn one party member against the rest. After killing both of them, go back out to the center ring and you will see [[Dreamscythe]] and [[Weaver]] flying around. |
||
| − | |||
| − | ==== The Dreamer ==== |
||
| − | To awaken the final boss, you'll have to defeat his children, four large green dragons. First, take out [[Dreamscythe]] and [[Weaver]], pulling them back to a spot away from other dragonkin and safely away from the center hole. Keep these drakes turned away from the group, as they have acid spit that can spread across all five members. If you off-tank one drake, keep it turned to one side, away from the main tank and the rest of the group. Kill Dreamscythe first, and then Weaver. These mobs only sometimes drop loot, but can be skinned 100% of the time. |
||
| − | |||
| − | [[Shade of Eranikus]] is located in the hallway to the south, protected by two more large drakes. Before you head that way, make sure you kill all of the mobs in the center area, and the ones hidden in the small tunnel in front of the staircase back to the entrance (located to the north). There are no dragonkin located in the western hallways, only wind serpents. |
||
| − | |||
| − | Head to the southern tunnel, and clear out the mobs until you can see [[Hazzas]] and [[Morphaz]] flying around. Once ready, pull them back into the hallway, and once again split the dragons up and turn them. These two have the ability to knockback players, so tank them with your back to the wall. |
||
| − | |||
| − | You've finally made it to the [[Shade of Eranikus]], who is sitting alone in a large room. If you didn't clear the entire floor of dragonkin, they will begin running to attack you once you pull Shade. Simply tank Shade like any other dragon, to one side so melee DPS is standing at his stomach and ranged is safely away from his face and tail. This is a long fight so have buffs and heals ready. A Priest's Lightwell is extremly useful here. Once Eranikus dies he will give the Essence of Eranikus which begins and finishes a quest in the room, rewarding everyone with the [[Chained Essence of Eranikus]]. After finishing Shade, unless you can face the [[Avatar of Hakkar]], your only choice is to go somewhere else. You can either run back to the center area and up the stairs to the north, fall down the pit in the center safely (with slow fall or levitate), or hearth. |
||
| − | |||
| − | ==== Optional: Avatar of Hakkar ==== |
||
| − | If someone in your group has completed the quest chain beginning with {{questlong|Neutral|44|Screecher Spirits}}, they will either have the egg of Hakkar or a special scroll that will allow them to summon him in the room to the west. |
||
| − | |||
| − | ---- |
||
| − | [http://wow.allakhazam.com/db/zone.html?wzone=73;mid=1176658842206791823;page=1;howmany=50#1176658842206791823 Sunken Temple guide on Allakhazam] |
||
== Resources == |
== Resources == |
||
| Line 246: | Line 217: | ||
== Dungeon denizens == |
== Dungeon denizens == |
||
| ⚫ | |||
| − | |||
* {{RaceIconExt|BogBeast|Small}} [[Bog beast]]s |
* {{RaceIconExt|BogBeast|Small}} [[Bog beast]]s |
||
* {{RaceIconExt|DireTroll|Small}} [[Dire troll]]s |
* {{RaceIconExt|DireTroll|Small}} [[Dire troll]]s |
||
| Line 268: | Line 237: | ||
See [[Temple of Atal'Hakkar loot]]. |
See [[Temple of Atal'Hakkar loot]]. |
||
| − | == |
+ | == Videos == |
| + | {| class="darktable" |
||
| + | |- |
||
| + | ! Sunken Temple (circa {{cata-inline}} Cataclysm) |
||
| + | |- |
||
| + | ![[File:NivTut - Sunken Temple|425px]] |
||
| + | |} |
||
| + | |||
| + | == Patch changes == |
||
| + | *{{Patch 4.0.3a|note=Level range raised to 52 - 55, but layout dramatically simplified.}} |
||
| + | *{{Patch 3.2.0|note=Meeting stone now operational for all levels, previously level 45 - 53.}} |
||
| + | *{{Patch 2.3.0|note=Boss levels lowered.}} |
||
| + | *{{Patch 1.4.0|note=The minimum level requirement on the Temple of Atal'Hakkar Meeting Stone has been properly assigned.}} |
||
| + | *{{Patch 1.3.0|note=Capped at ten players.}} |
||
| + | |||
| + | == References == |
||
| + | {{reflist}} |
||
| + | |||
| ⚫ | |||
| ⚫ | |||
| + | |||
| + | == External links == |
||
<!-- Read http://www.wowwiki.com/WoWWiki:External_links before posting your links here. |
<!-- Read http://www.wowwiki.com/WoWWiki:External_links before posting your links here. |
||
Links that do not conform to the rules will be DELETED. |
Links that do not conform to the rules will be DELETED. |
||
Repeat violations may result in a BAN. |
Repeat violations may result in a BAN. |
||
Have a nice day. :) --> |
Have a nice day. :) --> |
||
| + | {{bnetwowinstance|Sunken Temple}} |
||
| − | {{ |
+ | {{elinks-zone|1417}} |
| − | {{Elink|link=http://www.wowgroupings.com/index.html?instance=14|site=WowGroupings|desc=Group & Raid Scheduler|}} |
||
| + | |||
| ⚫ | |||
| ⚫ | |||
{{Green Dragonflight}} |
{{Green Dragonflight}} |
||
{{Dungeons}} |
{{Dungeons}} |
||
<!-- The instance entrance is found here, but the instance is not a subzone of the zone --> |
<!-- The instance entrance is found here, but the instance is not a subzone of the zone --> |
||
| + | |||
| − | {{DEFAULTSORT:Temple Of Atal'hakkar}} |
||
| ⚫ | |||
| + | [[pl:Temple of Atal'Hakkar]] |
||
| + | |||
[[Category:Instances]] |
[[Category:Instances]] |
||
| ⚫ | |||
[[Category:Swamp of Sorrows]] |
[[Category:Swamp of Sorrows]] |
||
| − | [[Category: |
+ | [[Category:Temple of Atal'Hakkar| ]] |
[[Category:Temples]] |
[[Category:Temples]] |
||
| + | [[Category:Troll territories]] |
||
Latest revision as of 01:09, 25 December 2017
This article or section contains information that is out-of-date.
|
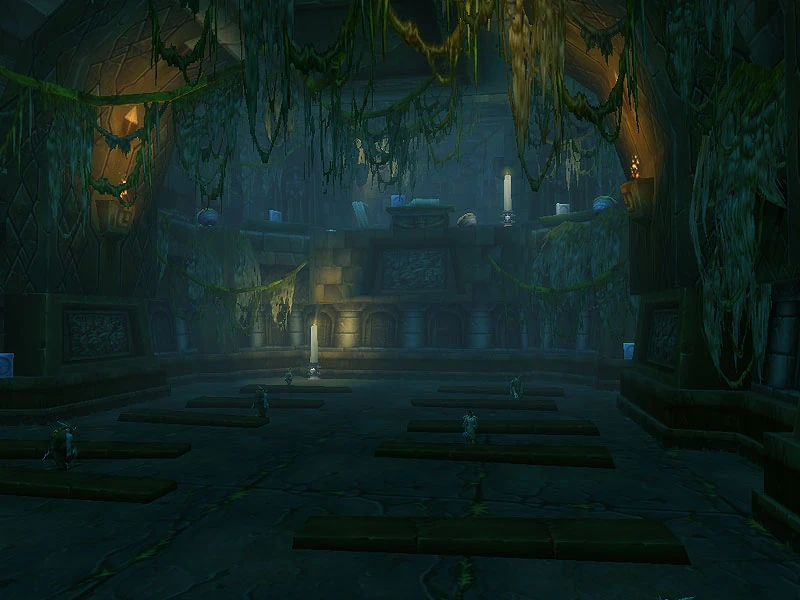
Temple of Atal'Hakkar (also known as Sunken Temple and more rarely, Lost Temple) is a shrine erected by the Atal'ai trolls, led by their master Jammal'an the Prophet, to the nefarious Blood God — Hakkar the Soulflayer. Believing that this was the intended site for Hakkar's reentry into Azeroth, the great Dragon Aspect, Ysera, and her green dragonflight sunk the temple into the depths of the Swamp of Sorrows...but the dragons did not realize that it was the wrong location until it was too late.
Many of the bosses in the instance have some kind of prerequisite in order to encounter them. Atal'alarion will appear after activation of statues, Jammal'an the Prophet can only be reached by killing the 6 troll mini-bosses, Avatar of Hakkar must be summoned and the Shade of Eranikus will only be killable after the death of the Prophet.
The Temple may be entered by level 45. The mob level range is 40-55, with the final boss being 55.
History
On the official site
From World Dungeons on the old WoW site:
- Over a thousand years ago, the powerful Gurubashi Empire was torn apart by a massive civil war. An influential group of troll priests, known as the Atal'ai, attempted to bring back an ancient blood god named Hakkar the Soulflayer. Though the priests were defeated and ultimately exiled, the great troll empire buckled in upon itself. The exiled priests fled far to the north, into the Swamp of Sorrows. There they erected a great temple to Hakkar - where they could prepare for his arrival into the physical world. The great dragon Aspect, Ysera, learned of the Atal'ai's plans and smashed the temple beneath the marshes. To this day, the temple's drowned ruins are guarded by the green dragons who prevent anyone from getting in or out. However, it is believed that some of the fanatical Atal'ai may have survived Ysera's wrath - and recommitted themselves to the dark service of Hakkar.
The name Atal’Hakkar can mean either "Devoted to Hakkar" or "In Honor of Hakkar" in Zandali, the language of the trolls.[1]
Geography
")
")
")
")
")
In Cataclysm
Lua error in package.lua at line 80: module 'Module:Inlinegfx/img_link_data.json' not found.
The Sunken Temple was raised to a level 50-60 dungeon in Cataclysm.
Quest guide

Temple of Atal'Hakkar bosses
| Quest name | Quest giver | Zone location | |
|---|---|---|---|
|
Dwarven District, Stormwind City | ||
|
Feralas | ||
|
Stonard, Swamp of Sorrows | ||
|
Ratchet, The Barrens | ||
|
|
Broken Pillar, Tanaris | |
|
Broken Pillar, Tanaris | ||
|
Steamwheedle Port, Tanaris | ||
| Shadra'Alor, The Hinterlands | |||
| Drops off Shade of Eranikus, Inside Sunken Temple | |||
|
|
Un'Goro Crater | |
|
|
Timbermaw Hold, Azshara
| |
|
|
Chillwind Point ruins, Alterac Mountains | |
|
Chillwind Camp, Western Plaguelands | ||
|
Royal Quarter, Undercity | ||
|
|
Timbermaw Hold, Azshara | |
|
|
Azshara Tower, Azshara
| |
|
Azshara Tower, Azshara | ||
|
|
On the border between Swamp of Sorrow & Blasted Lands
| |
|
|
Shatter Scar Vale, Felwood
| |
Group info
A good group to have for this instance would consist of a tank, a healer, and three damage dealers, preferably one with good AoE. AoE's are very helpful, as there are many packs with non-elites. The instance offers a lot of opportunity for crowd control (specifically rogue saps and Priest shackle undeads, and magic dispels (from priests, paladins, and Resto shamans) make it a lot easier, as there a various negative effects (Fear and Sleep being the most dangerous). One of the three damage dealers should be able to tank, or have a pet that can tank, for the Shade of Eranikus fight.
Each class brings something useful to this instance, and as much depends on player skill and character levels as does group composition. That said, it's very nice to have reliable Crowd Control, good healing from a suitably geared and/or spec'd healer, as well as some form of out of combat Resurrection and Wipe Recovery.
One of the most important things to bring to this instance is knowledge of the layout or a good guide/map, as it's very easy to get lost here!
Walkthrough
- See pre-Lua error in package.lua at line 80: module 'Module:Inlinegfx/img_link_data.json' not found. Cataclysm walkthrough at Old walkthrough.
Resources
Skinning
Dungeon denizens
 Bog beasts
- Dire trolls
- Green dragon (one, Shade of Eranikus)
- Green drakes
- Green dragonspawn
- Green dragon whelps
- Grells
- Larvae
- Oozes
- Serpents
- Skeletal wind serpent (one, Avatar of Hakkar)
- Snakes
- Trolls
- Wind serpents
- Worms
- Scourge trolls
Loot
See Temple of Atal'Hakkar loot.
Videos
| Sunken Temple (circa Lua error in package.lua at line 80: module 'Module:Inlinegfx/img_link_data.json' not found. Cataclysm) |
|---|

|
Patch changes
- Lua error in package.lua at line 80: module 'Module:Inlinegfx/img_link_data.json' not found. Patch 4.0.3a (2010-11-23): Level range raised to 52 - 55, but layout dramatically simplified.
- Lua error in package.lua at line 80: module 'Module:Inlinegfx/img_link_data.json' not found. Patch 3.2.0 (04-Aug-2009): Meeting stone now operational for all levels, previously level 45 - 53.
- Lua error in package.lua at line 80: module 'Module:Inlinegfx/img_link_data.json' not found. Patch 2.3.0 (13-Nov-2007): Boss levels lowered.
- Lua error in package.lua at line 80: module 'Module:Inlinegfx/img_link_data.json' not found. Patch 1.4.0 (2005-05-05): The minimum level requirement on the Temple of Atal'Hakkar Meeting Stone has been properly assigned.
- Lua error in package.lua at line 80: module 'Module:Inlinegfx/img_link_data.json' not found. Patch 1.3.0 (07-Mar-2005): Capped at ten players.
References
- ^ Dark Factions, pg. 127
See also
External links
| |||||
| ||||||||||||||
| |||||||||||||||||||||||||||||||||||||||||